PikesOpen Pikes

Product updates

New features, improvements and fixes in Pikes.

Improvement

Ideogram 4.5 for image generation

Ideogram 4.5 replaces Ideogram 4, with high-quality generation and your detailed image brief passed through unchanged.

Details and how to use

Choose Ideogram 4.5

Select Ideogram 4.5 in the image model picker, or ask the Agent to use it. You can use it for photography, posters and images with text.

Native 2K, high quality

Generation uses native 2K sizes and costs 9 credits per image. The previous 4K option is no longer offered.

Continue from saved images

Saved Ideogram 4 selections and reruns now use 4.5. Existing images retain their original model history. This option generates from a text prompt; use Creativity Pro or Consistency Pro for image editing.

Link to this update

New feature

3D direction references for product images

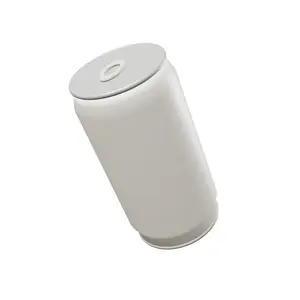
Show the angle you want. Pose a simple 3D product on your project canvas, then use it alongside your product photo to guide a new image.

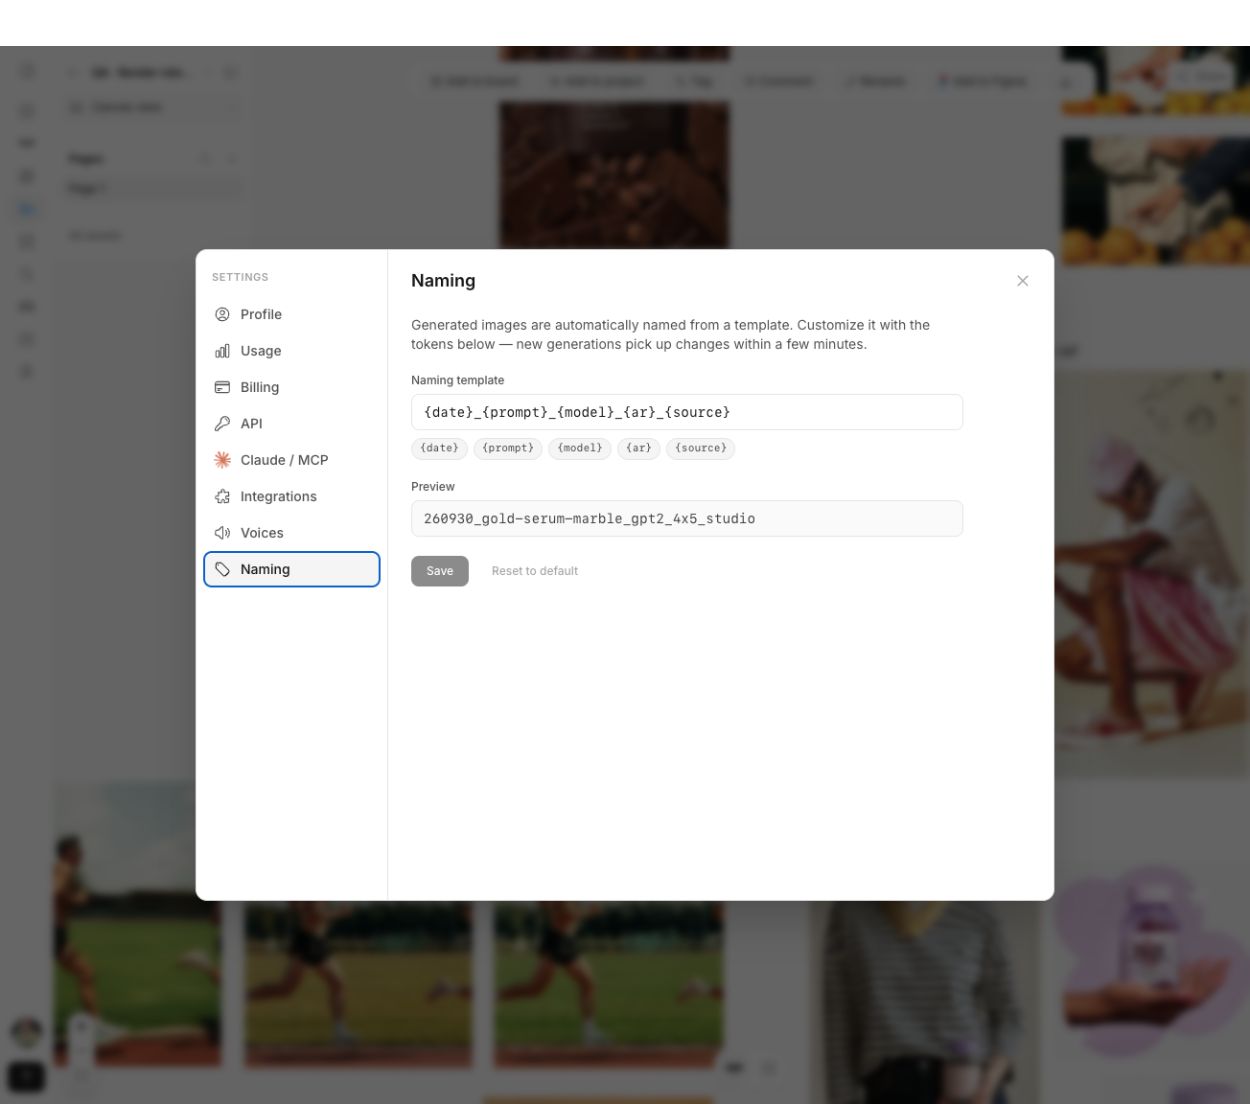
Original pink Pikes Cherry Blossom can on a pink background.
The original product photo supplies the branding, colors and packaging.
Neutral can tilted with its top visible, used as the direction reference.

Direction reference

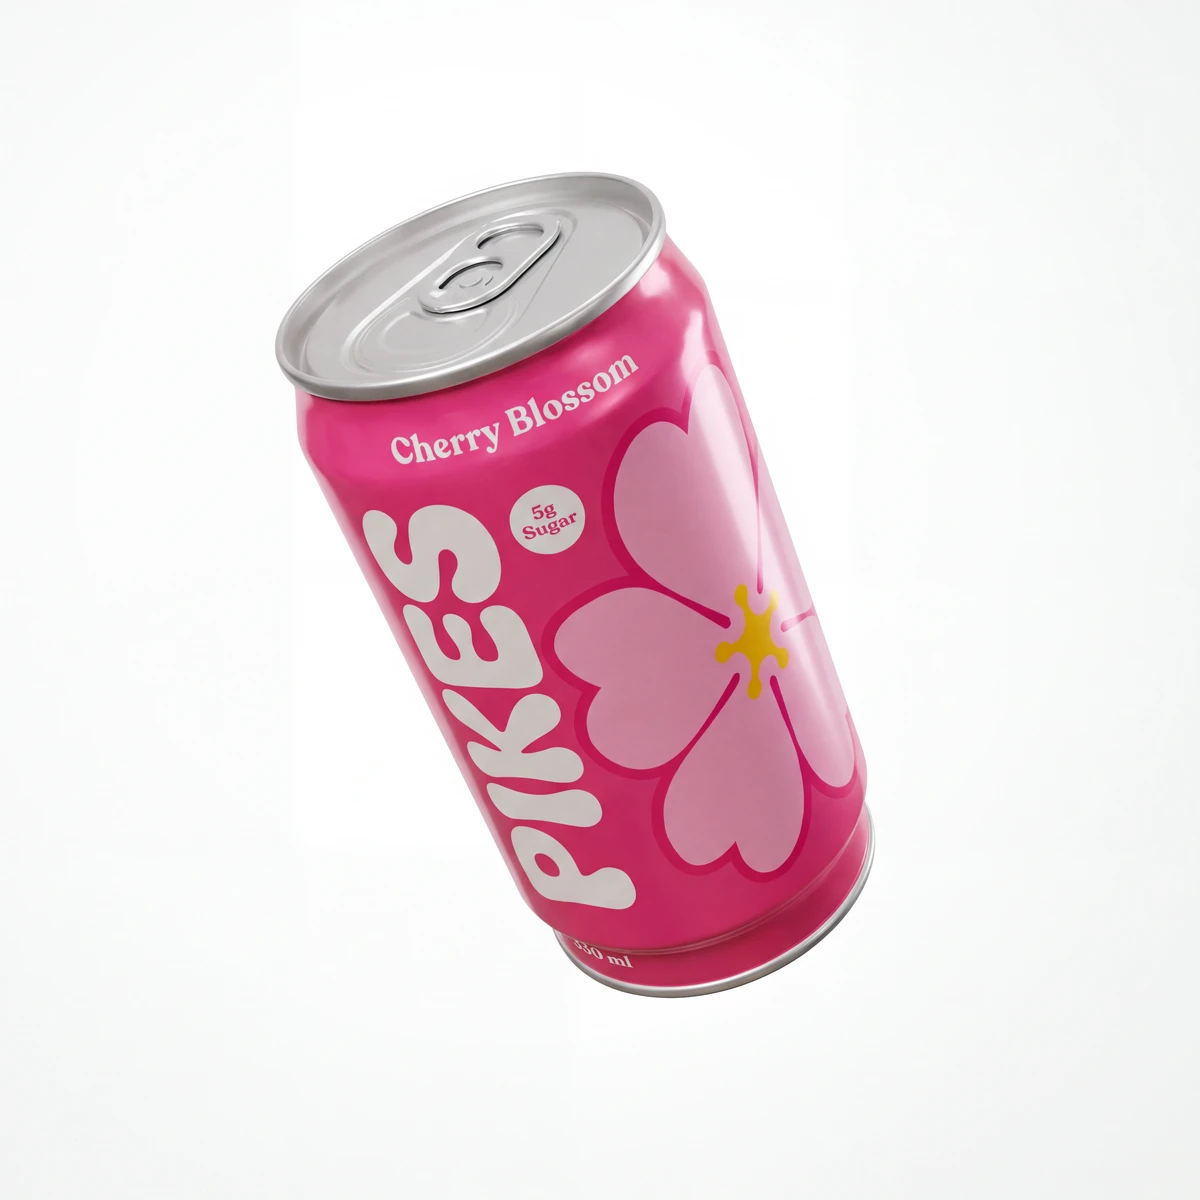
Generated pink Pikes Cherry Blossom can at the corresponding angle with its top visible.

Generated result

A view from above: the neutral direction reference and the generated product image.
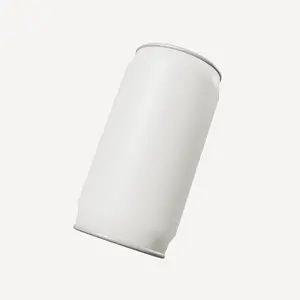
Neutral can tilted in the opposite direction and viewed from below.

Direction reference

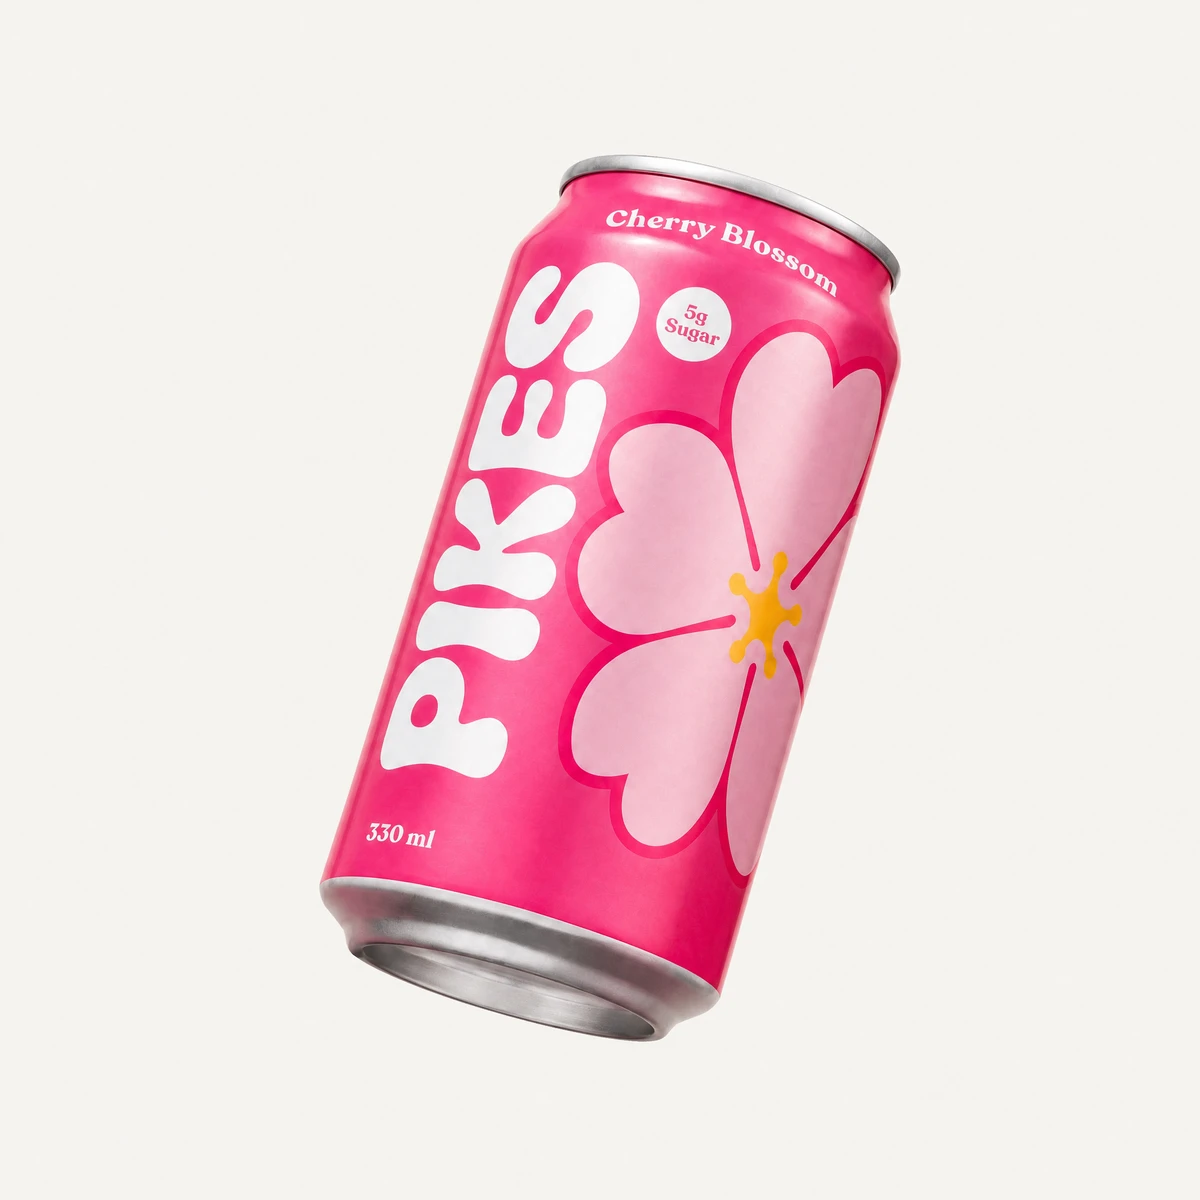
Generated pink Pikes Cherry Blossom can tilted with its base visible.

Generated result

A view from below: a second direction reference gives the same product a different angle.
Details and how to use

Add a direction reference

On a project canvas, open + → Direction reference, directly below Templates. A movable square appears on the canvas. Open its gear to choose a beverage can, cylinder, pouch, supplement jar or box.

Set the angle and framing

Drag inside the square to rotate the product. Scroll or pinch on your trackpad to zoom it. Drag the title to move the reference around your canvas.

Generate with your product

Select the direction reference and your product photo, then ask the Agent for the shot or generate from the Studio prompt bar. Pikes passes the posed reference as an image: it guides orientation and framing, while your product photo supplies the branding and appearance. The examples above use the same original photo with two different poses.

Link to this update

Improvement

Find teams and manage member roles

A cleaner Teams page with search, inline role controls and a dedicated invitation view.

Details and how to use

Find people faster

Search your teams by name and search members by name or email. Team controls stay visible as you scroll.

Manage access in place

Owners and admins can click a member’s role to switch between Member and Admin. Owners can also appoint an additional owner while keeping their own ownership.

Keep invitations together

Use Invite people to invite a teammate. Owners and admins can review invitations and join requests in the Invitations tab.

Link to this update

New feature

Bulk frame export and Figma transfer

Export a selection of frames together, or send them to Figma with editable text, shapes and supported groups.

Details and how to use

Export a whole selection

Select frames on your project canvas and right-click → Export frames as PNG (ZIP). Each frame becomes a separate PNG in one download. A single frame can still be exported on its own.

Continue editing in Figma

Choose Transfer frames to Figma from the same menu. Pair the Pikes AI plugin in Settings → Integrations → Figma and open it in your destination file to receive the frames. Supported text, shapes, images and groups arrive as individual layers; complex artwork and effects are preserved as image layers.

Connect when you need to

If a pasted Figma link needs an API key, Pikes now shows a persistent connection message with an Open settings button. Transfers also point you to settings when the plugin needs pairing.

Link to this update

New feature

Editable templates in Projects

Start with one of 180 existing ad compositions, including 50 nail formats, and edit its text and design elements on your canvas.

Details and how to use

Choose a composition

Open a project page, choose + → Templates at the bottom of the menu, and search by brand or format. Click a reference preview to add its composition as an editable frame.

Make it your own

Double-click the frame to edit text, shapes, groups and colors. Reference previews show the original ads; inserted compositions contain editable text and elements, with photography added separately.

Link to this update

Improvement

Recover paused agent conversations

Paused tasks now have a visible stop control so waiting messages can continue.

Details and how to use

Continue after a pause

When a paused task holds up your conversation, choose Stop paused task above the message box. Completed work stays saved and waiting messages can run.

Link to this update

Fix

Independent images in duplicated groups

Editing an image inside a duplicated group now changes only that copy.

Details and how to use

Duplicate and edit separately

Duplicate or copy and paste a group in a project, then select an image inside the copy to edit it. The original image keeps its position and appearance. This also works for groups inside other groups.

Existing projects

Previously linked copies are separated when you reopen the project. The correction is saved with your next edit.

Link to this update

New feature

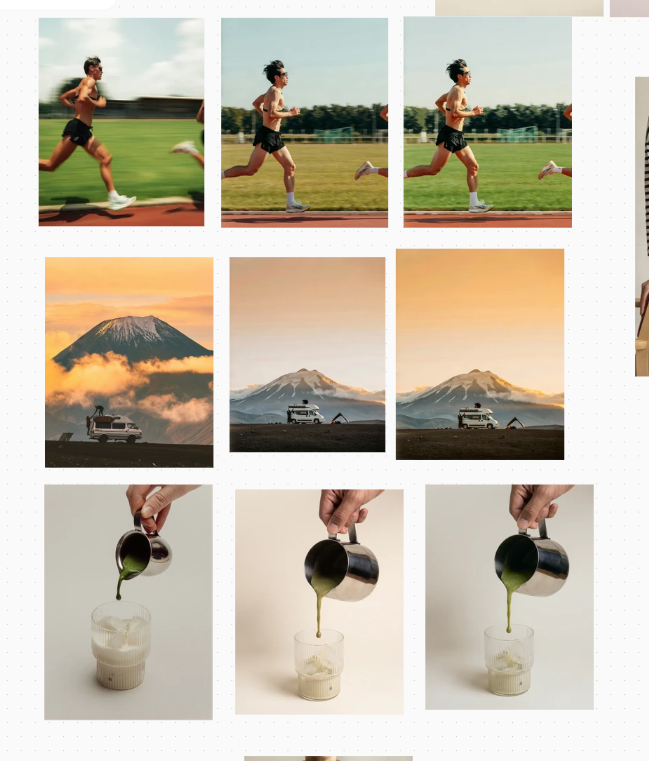
Recolor images using a reference

You can now use one image as a color reference for others on your project canvas. Recolor adjusts the palette and tones while keeping the generated composition.

Three rows showing a runner, a mountain and camper van, and a matcha drink. Each row compares the reference on the left, a new generation in the middle, and the recolored result on the right.
Left to right: reference → new generation (no input image) → recolored result.
Details and how to use

Use it on your canvas

Select the reference and the images you want to recolor. Right-click → Recolor → Use image X as reference. Hover a thumbnail for a larger preview. Recolored copies appear on the canvas, with your originals intact.

Work on a whole set

Two images can process at once, with additional images queued. You can start another selection while work is running, and the canvas brings loading cards into view.

Link to this update

Improvement

Board access and folder sharing improvements

Subfolders inherit sharing from their parent by default. Folder owners can change this, and direct board and folder shares stay in place.

Details and how to use

Share from the folder

The Share action now sits at the top of folders and distinguishes inherited access from direct shares. Subfolders inherit their parent’s sharing by default; folder owners can turn off Inherit parent sharing for a subfolder. Direct folder and board shares stay in place.

Shared boards stay visible

Fixed permission handling that could hide shared boards, including boards with their own direct share.

Link to this update

New feature

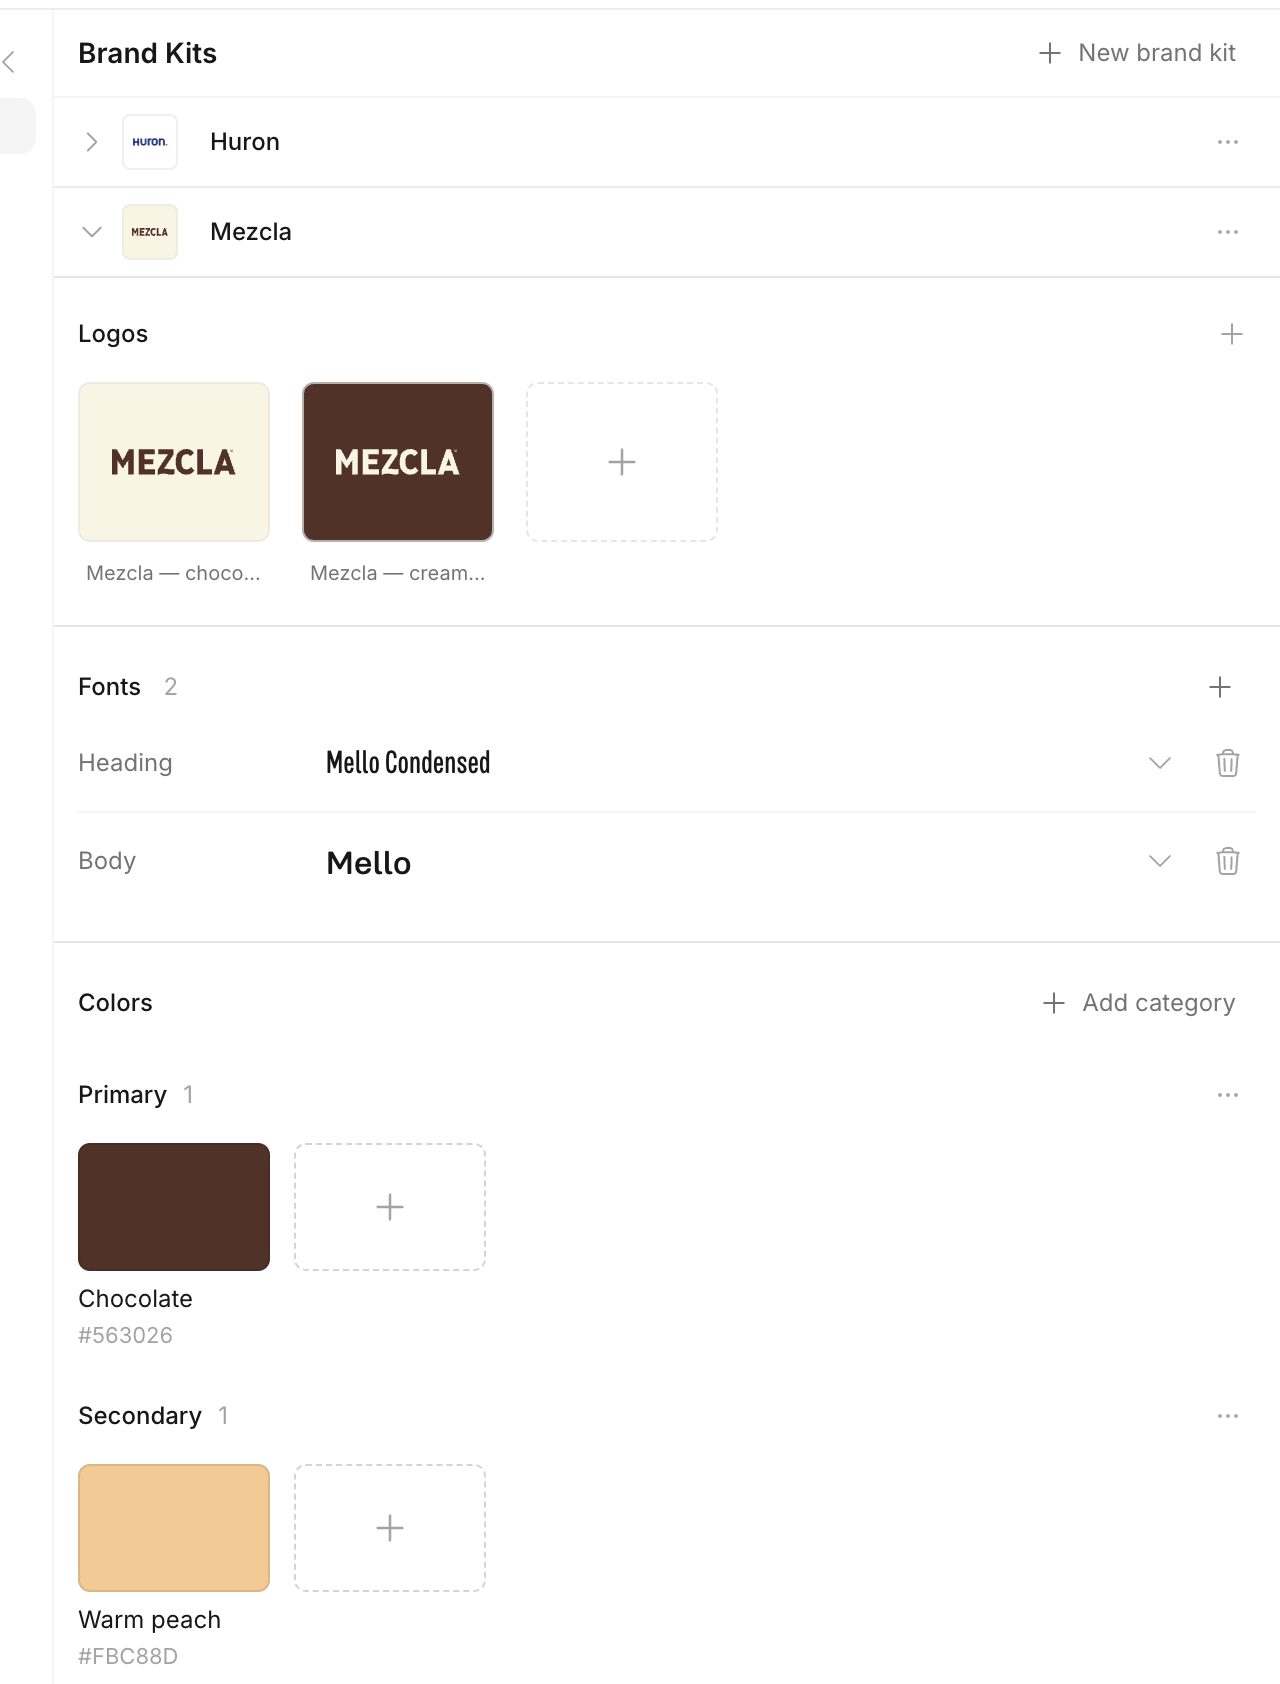
Brand Kits for logos, fonts and colors

Keep logos, fonts and color palettes together in Brand Kits. Manage multiple brands in one place, with font previews and colors organized by category.

Brand Kits in Pikes, showing logos, heading and body fonts, and color palettes.
Keep logos, fonts and colors together in a Brand Kit.
Details and how to use

Bring a kit onto a project

Open a project’s + menu → Add brand kit, choose a kit and click Add. Its logos, color blocks and font samples arrive in a named, editable canvas section. Add another kit or pick individual assets as needed.

Create with your brand as a reference

Find Brand Kits above Assets in the Studio sidebar. Click a logo, color or font to attach it to your input. Kits are also available from the agent’s + attachment picker, and brand fonts and colors appear in the editor’s pickers.

Start organized

Logos and colors collected from your website during signup now go into a Brand Kit.

Link to this update

New features & fixes

Project pages and canvas improvements

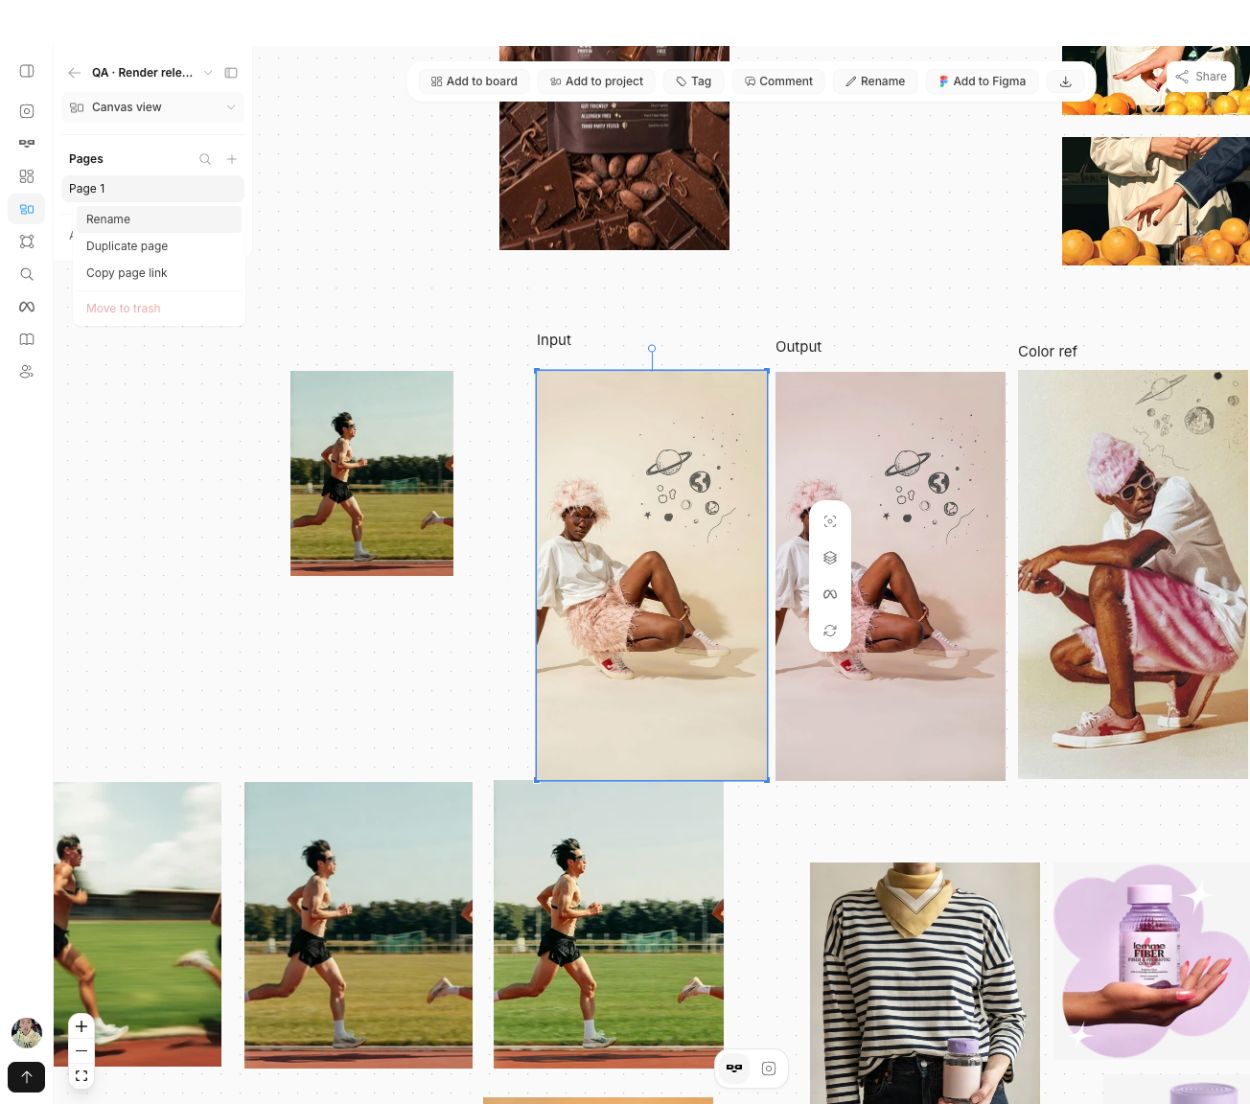
You can now split a project into multiple pages, switch between concepts and search across the project. This release also improves alignment, frames, sharing and downloads.

Project pages sidebar and the menu for renaming, duplicating and linking to a page.
Manage pages from the project sidebar.
Details and how to use

Several pages, one project

Create separate canvases for concepts, campaigns or feedback rounds. Rename, duplicate, reorder and search pages, and see where teammates are working. The app sidebar collapses when you open a project to give you more room.

Move, align and edit with confidence

Cut a selection with Cmd/Ctrl+X and paste at your cursor while keeping its spacing. Dragging and resizing snap to nearby edges and centers. Right-clicking a selected image keeps the group selected. Frames have more reliable text placement, sizing and export, and uploaded brand fonts load with the canvas.

Iterate from the original inputs

Recreate follows your selected prompt mode: Direct Prompt restores the prompt and original references in that bar; Agent restores the recipe there instead. Restored references replace the previous attachments.

Find, share and download

Board and project sharing is easier to find, including across teams. Download selections as a ZIP or separate files, with canvas crops preserved. Board and project pickers support search, and boards support sorting and double-click renaming.

Check placements and connect your tools

Use the Meta safe-zone overlay to preview placement crops and interface coverage without including it in exports. Connected agents can organize folders, products and brand colors and use your naming convention. Pikes results have richer media viewers, and the Claude install link comes prefilled.

Reliability improvements

Fixed large canvases failing to open, oversized references blocking agent threads, background removal interrupting the next step, and Figma sign-in links in production. The agency page now directs visitors to its plans and booking links without showing pricing amounts.

Link to this update

New feature

Crop images and remove backgrounds on the canvas

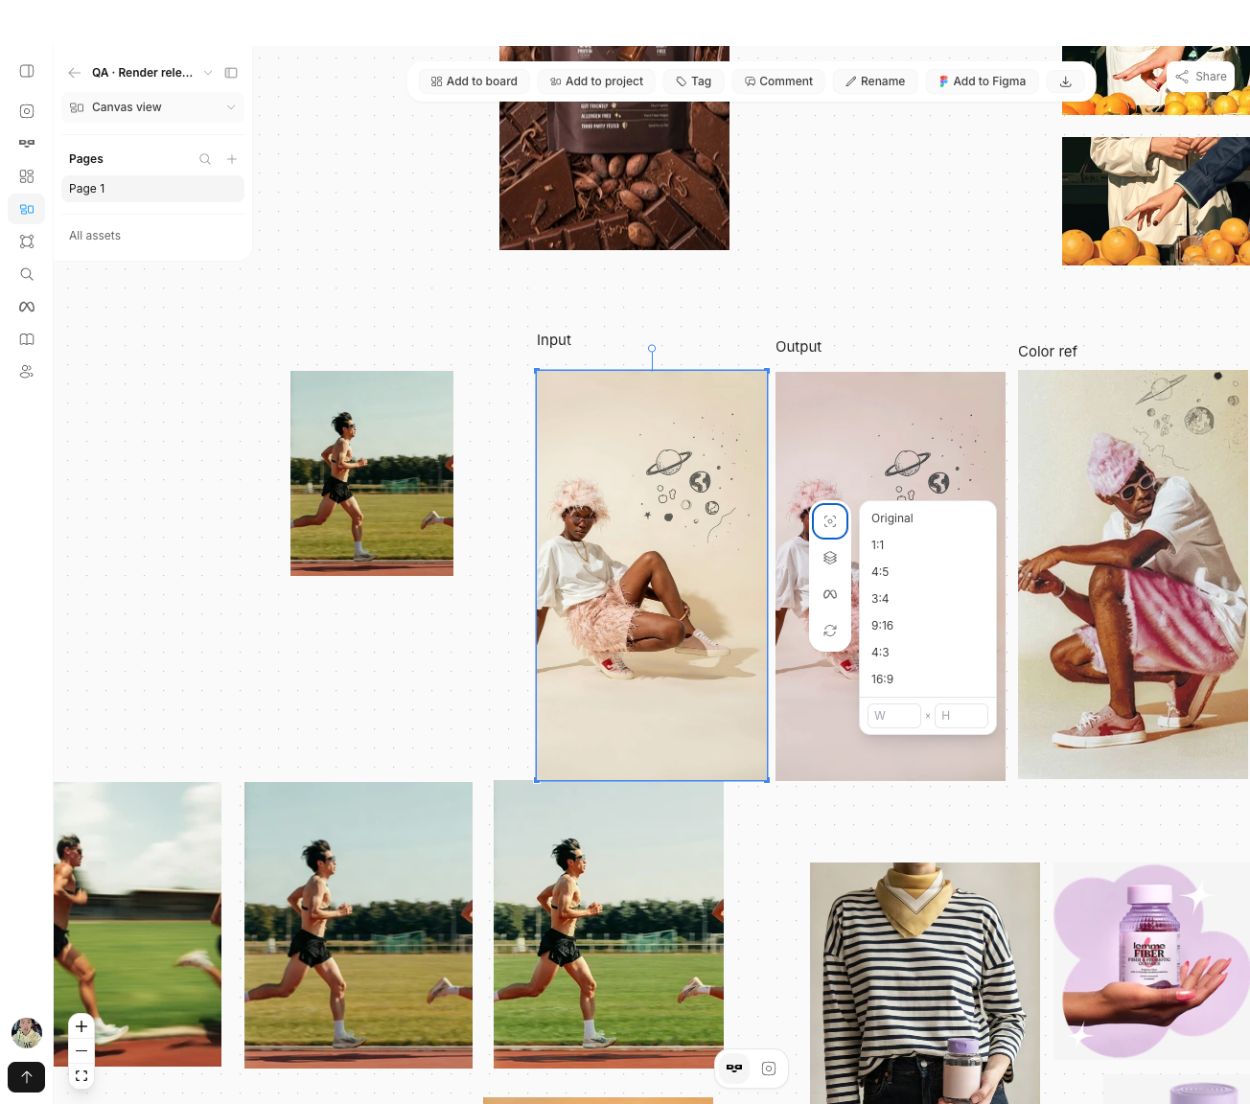
Select an image on a project canvas to reveal its image toolbar. Crop to a preset or your own dimensions, remove a background, or start a new iteration.

A selected canvas image with its resize toolbar open, showing aspect ratio presets and custom dimensions.
Select an image and open Resize to choose its format.
Details and how to use

A format for every placement

Choose 1:1, 4:5, 9:16 or enter dimensions such as 1080 × 1350. The card reshapes immediately without a generation or credit charge. Choose Original to restore it.

Cutouts and exports that match the canvas

Remove background lives in the same toolbar. Transparent PNGs show the canvas through them, and cropped downloads preserve your crop at full resolution. A single selected image downloads as an image file.

Keep the context when iterating

Recreate restores the image’s prompt, model and original references. Passing a project comment to the agent keeps it in that project, along with the asset and its inputs. Add to Figma also supports selections containing teammates’ assets.

Link to this update

New features & fixes

Board folders and more reliable canvas layouts

You can now organize boards in nested folders and move several boards at once. Asset search covers the whole library, and canvas positions save more reliably.

Details and how to use

Folders that fit your workflow

Group boards in nested folders. Drag a board onto a folder or breadcrumb, use Move to from its menu, or select several boards to move them together.

Find the whole library

Asset folders load their own contents with Load more, so older assets remain accessible. Search and sorting cover your whole library, including folders you haven’t opened.

Layouts stay where you put them

Card positions and sizes save together, and slow refreshes no longer undo an active drag. New generations reserve their own space instead of stacking over earlier batches.

Link to this update

Fixes

More reliable Studio generations

Better uploads, clearer failure messages and recovery for interrupted renders.

Details and how to use

Better on slow connections

Reference photos over 4 MB are compressed in your browser before upload. Generation failures and lost statuses now show an error instead of silently removing the loading card.

Keep completed work

Fixed completed images not appearing in the grid. Studio generations register for recovery so interrupted work can recover after a server restart. Images that fail to save to your library are not billed.

Link to this update

New feature

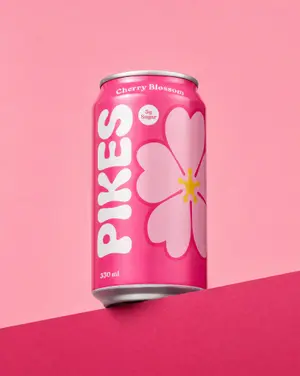
Automatic asset names and export naming

Images and videos now get names based on the date, prompt, model and format. Set a default naming convention or a separate export template for each board.

Naming settings showing template tokens and a generated filename preview.
Settings → Naming shows a live preview of your template.
Details and how to use

Automatic names, easy renaming

Generated images and videos use names based on their date, prompt, model, aspect ratio and source. Use the pencil in the image modal to rename one asset, or select several in a board for numbered bulk renaming.

A convention for each board

Use the settings beside Download all to set a board’s export naming template. Downloads and ZIPs follow it, so the same asset can use different conventions for different projects. Downloads show progress from the first click.

Set your default or ask the agent

Open Settings → Naming for a template with a live preview. It applies to assets you haven’t explicitly named. You can also ask the agent to rename a board’s assets or set your default convention.

Link to this update