

Mike Lehman
The Ultimate Guide to Jewelry Photography for E-commerce in 2026
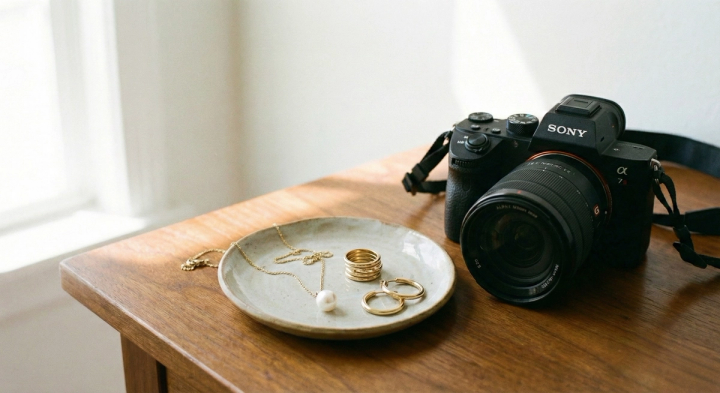
In the dazzling world of e-commerce, high-quality images are your most valuable asset. This is especially true for jewelry brands, where the intricate details and sparkle of each piece must be captured perfectly to entice customers. This guide will walk you through everything you need to know about jewelry photography, from the essential equipment to advanced editing techniques. We’ll also explore how AI is revolutionizing the industry, offering new ways to create stunning product visuals with ease.
Why High-Quality Images Matter for Jewelry Brands
In online retail, your product images are the first point of contact with potential customers. For jewelry, this is even more critical. A 2023 report from Statista revealed that the US jewelry market was valued at approximately 63 billion US dollars. With such a competitive market, exceptional photography is not just an option—it’s a necessity. High-quality images build trust, justify price points, and create an emotional connection with shoppers. They allow customers to see the fine details, the quality of the materials, and the craftsmanship of each piece, which are all crucial factors in the decision-to-purchase.
Essential Equipment for Jewelry Photography
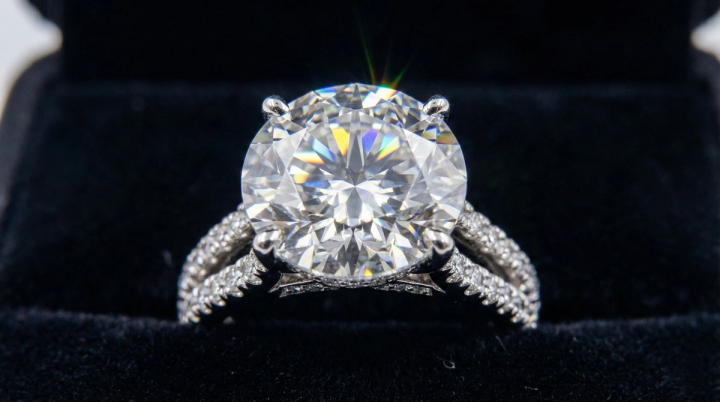
Getting started with jewelry photography doesn’t have to break the bank. You can achieve professional-looking results with a modest setup. However, investing in the right gear will significantly improve the quality of your images. Here’s a breakdown of essential equipment, categorized by budget.
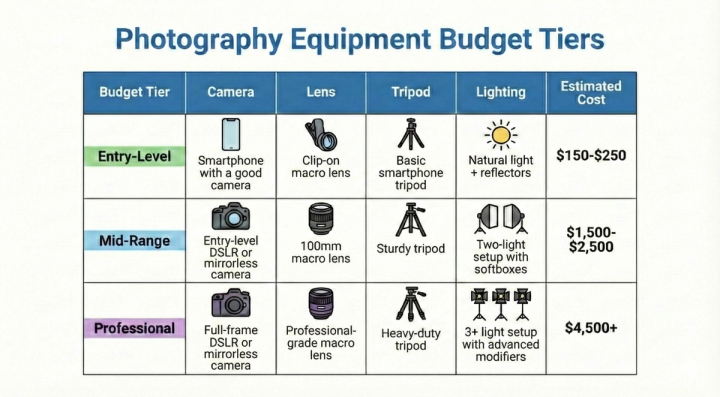
For those who want to skip the equipment entirely, AI-powered solutions like Pikes can generate high-quality product photos without any camera gear. This is a game-changer for brands looking to scale their visual content quickly and affordably.
Lighting Techniques for Flawless Jewelry Photos
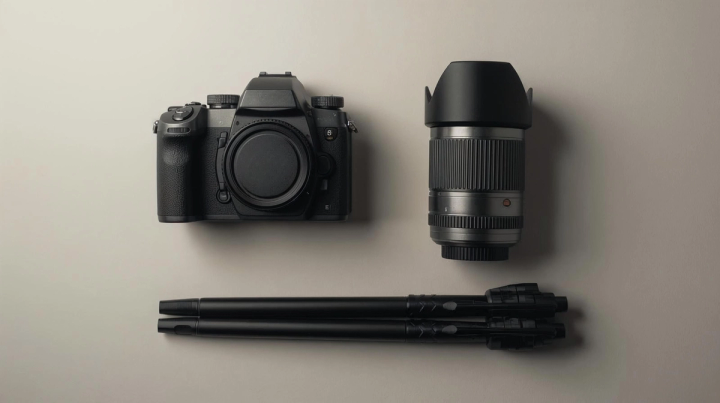
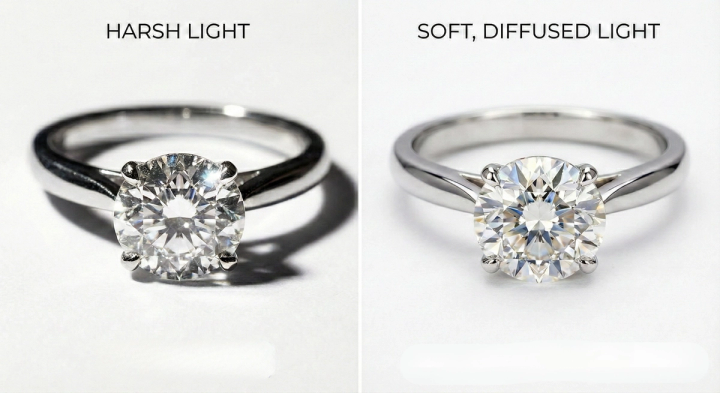
Lighting is the most critical element in jewelry photography. It can make or break your images. The goal is to create soft, diffused light that illuminates the piece evenly, minimizes harsh shadows, and brings out the natural sparkle of the gemstones.
Natural Light
Natural light is a great starting point for beginners. It’s free and can produce beautiful, soft lighting. Position your setup near a large window on an overcast day to get the best results. Avoid direct sunlight, as it creates harsh shadows and overexposed highlights. You can use a white reflector to bounce light back onto your subject and fill in any shadows.
Artificial Light
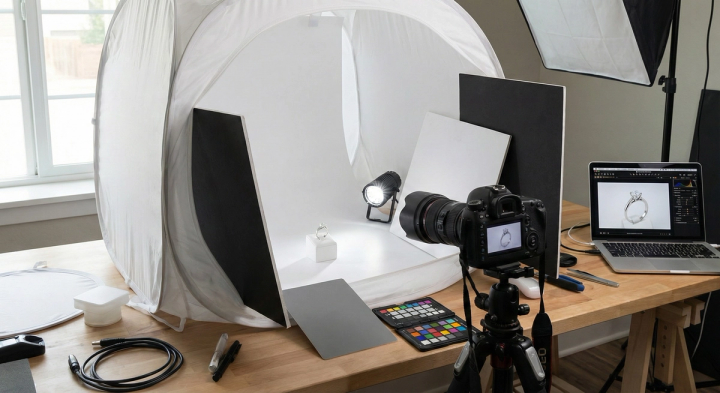
For more control and consistency, an artificial lighting setup is essential. A two-light setup is a good starting point. Place one light on each side of your product, angled at 45 degrees. Use softboxes or diffusers to soften the light and create a gentle, even illumination. This will help you capture the intricate details of your jewelry without any distracting reflections.
Common Lighting Mistakes to Avoid
- Harsh Shadows: Caused by direct, hard light. Always use diffusers to soften your light source.
- Unwanted Reflections: Jewelry is highly reflective. Use a light tent or position your lights carefully to avoid capturing your reflection in the piece.
- Inconsistent Lighting: This can make your product catalog look unprofessional. Use a consistent lighting setup for all your photos.
Backgrounds and Props: Setting the Scene
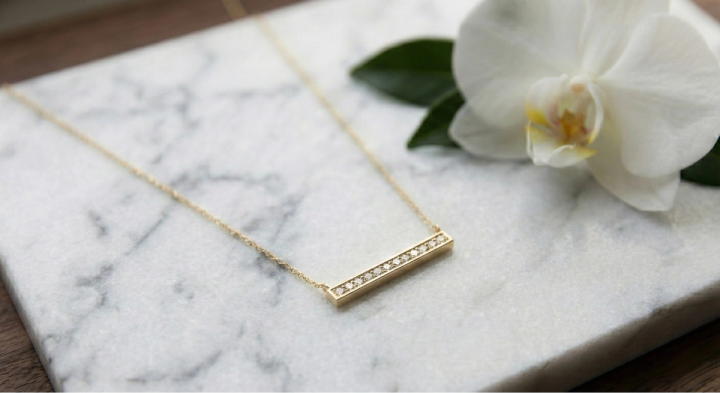
The right background and props can elevate your jewelry photos from simple product shots to compelling lifestyle images. The background should complement the piece without distracting from it. A clean, simple background like white, gray, or black is always a safe choice. You can also experiment with different textures and materials, such as marble, wood, or linen, to add visual interest.
When it comes to props, less is more. Choose props that are relevant to your brand and the specific piece of jewelry. For example, you could use a delicate flower to complement a floral-inspired necklace or a vintage book to create a sense of timelessness. The key is to ensure that the jewelry remains the star of the show.
For brands that need a wide variety of backgrounds, AI can be a powerful tool. With Pikes, you can scale your backgrounds with AI, generating an endless supply of unique and creative settings for your jewelry.
Composition and Styling Tips
Composition and styling are the artistic touches that bring your jewelry photos to life. Here are a few tips to help you create visually appealing images:
- The Rule of Thirds: Imagine your frame is divided into a 3x3 grid. Place your subject at the intersection of the lines to create a more balanced and dynamic composition.
- Get Close: Use a macro lens to capture the intricate details of your jewelry. This is especially important for pieces with small gemstones or detailed metalwork.
- Tell a Story: Use props and styling to create a narrative around your jewelry. This will help customers connect with your brand on an emotional level.
- Show Scale: It can be difficult for customers to gauge the size of a piece of jewelry from a photo. Include a shot of the jewelry being worn by a model to provide a sense of scale.

Camera Settings for Jewelry Photography
Nailing your camera settings is crucial for capturing sharp, detailed jewelry photos. Here’s a table with recommended settings for different types of shots.
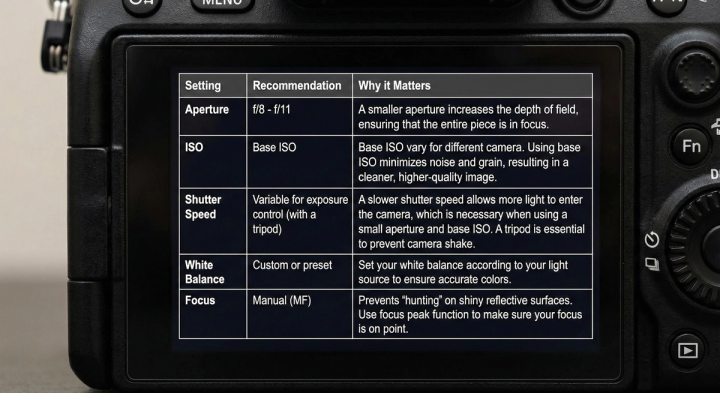
Focusing on a piece of jewelry is the hardest part of the process because the plane of focus is often thinner than a piece of paper at macro distances. So where to aim your focus is curcial.
Where to Aim Your Focus?
- Rings: Focus on the front prong or the top facet of the center stone. If the prong is blurry, the whole shot feels "off-focus."
- Necklaces/Chains: Focus on the part of the pendant closest to the lens.
- Earrings: Focus on the leading edge of the setting or the front-most gemstone.
Overcoming Common Jewelry Photography Challenges
Jewelry photography presents a unique set of challenges. Here’s how to overcome them:
- Managing Reflections: Use a light tent or a circular polarizer to control reflections. You can also use black cards to block unwanted light and create defined edges.
- Capturing Sparkle: To make gemstones sparkle, use a direct, hard light source in addition to your main diffused light. This will create those beautiful, eye-catching highlights.
- Achieving Accurate Colors: Use a gray card to set a custom white balance and ensure that the colors of your jewelry are represented accurately.
- Scaling Production: Photographing a large volume of jewelry can be time-consuming. For brands facing this challenge, scaling is a solvable challenge with Pikes, which can generate thousands of product photos in a fraction of the time.
Post-Production and Editing Workflow
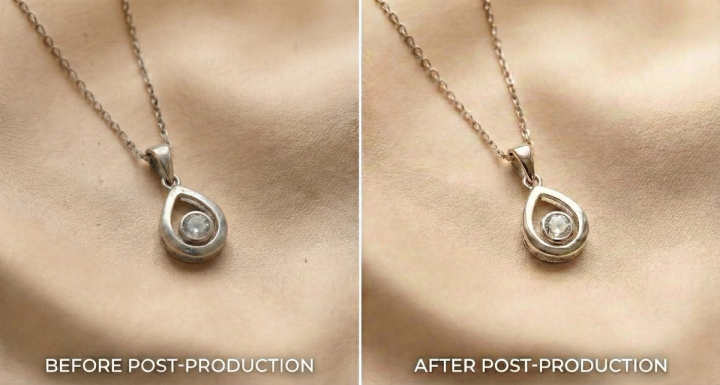
Post-production is where you polish your images to perfection. The goal is to enhance the photo without making it look unnatural. Here’s a typical editing workflow:
- Color Correction: Adjust the white balance and use a color checker to ensure accurate colors.
- Retouching: Remove any dust, scratches, or fingerprints from the jewelry. This is a meticulous process that requires a keen eye for detail.
- Sharpening: Apply a subtle sharpening filter to bring out the fine details of the piece.
- Background Removal: If you’re shooting for a pure white background, you’ll need to carefully cut out the product and place it on a new background.
This process can be a bottleneck for many brands. With AI, you can skip the editing queue and automate the entire post-production process, from retouching to background removal.
Platform-Specific Requirements
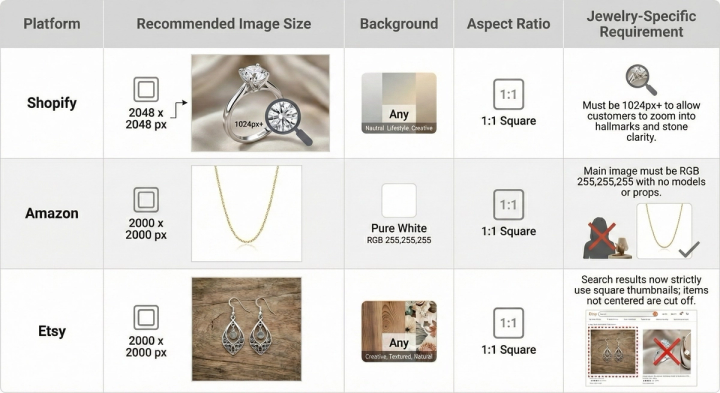
Different e-commerce platforms have different image requirements. It’s important to optimize your photos for each platform to ensure the best possible presentation. Here’s a table with the image specifications for some of the most popular platforms.
Jewelry-Specific Insights
- Amazon "Fade Out" Rule: For long jewelry items like necklaces or pendant chains that might touch the edge of the frame, Amazon requires you to "fade out" the product at the outermost edge so the border remains pure white. The product should ideally occupy 85% or more of the frame.
- The Amazon Model Exception: While some apparel allows models, Jewelry Main Images must be "product-only" on a pure white background. You should only use models in your secondary images (slots 2-7) to show scale and fit.
- Etsy Thumbnail Center: Because Etsy search is now 1:1, ensure the "hero" part of your jewelry (the gemstone or the main setting) is perfectly centered. If you shoot a wide necklace in landscape, the clasp or the ends of the chain will be cropped out in search.
- Shopify Retina Display: 2048px is the verified "Gold Standard" for jewelry. This resolution ensures that when a customer zooms in, they can see the quality of the prongs and the "fire" in the stones without pixelation on modern high-density screens.
How AI is Transforming Jewelry Photography
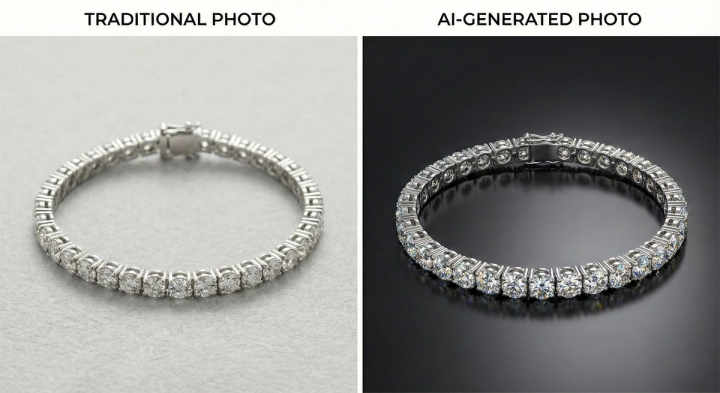
Artificial intelligence is changing the game for jewelry photography. AI-powered platforms like Pikes offer a powerful alternative to traditional photography, enabling brands to create stunning, high-quality product images at scale. Here’s a comparison of traditional photography and AI-powered solutions.
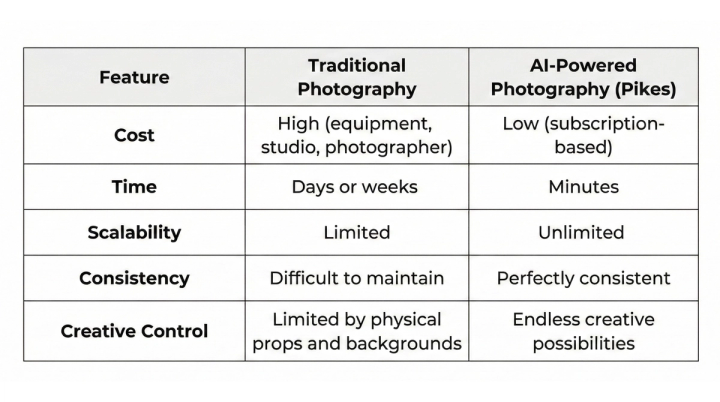
With Pikes, you can generate thousands of unique, on-brand images from a single product photo. It’s a powerful tool for any jewelry brand looking to elevate their visual content and stay ahead of the competition. For those considering other AI tools, be sure to check out our list of the best Kive alternatives.
Conclusion
High-quality jewelry photography is an essential investment for any e-commerce brand. By mastering the techniques of lighting, composition, and editing, you can create stunning images that capture the beauty and intricacy of your pieces. And with the rise of AI-powered solutions like Pikes, creating professional-grade product photos has never been more accessible. Whether you choose the traditional route or embrace the power of AI, the key is to create a consistent and compelling visual experience that will captivate your customers and drive sales.
Ready to transform your jewelry photography? Try Pikes today and see how AI can help you create stunning product visuals in minutes.
FAQ
1. What is the best camera for jewelry photography?
A DSLR or mirrorless camera with a 100mm macro lens is ideal for jewelry photography. However, you can also get great results with a modern smartphone and a clip-on macro lens.
2. How do I get a pure white background for my jewelry photos?
You can use a white light tent or a large sheet of white paper as a seamless background. In post-production, you can use a photo editing software to cut out the product and place it on a pure white background (RGB 255, 255, 255).
3. How do I make my jewelry sparkle in photos?
Use a combination of soft, diffused light and a small, hard light source. The hard light will create bright highlights that make the gemstones sparkle.
4. How much should I budget for jewelry photography?
A basic setup can cost as little as $50, while a professional setup can cost over $3,000. Alternatively, you can use an AI-powered solution like Pikes for a low monthly subscription fee.
5. How can I take good jewelry photos with my phone?
Use a tripod to keep your phone steady, shoot in natural light, and use a clip-on macro lens to capture the details. You can also use a mobile editing app to enhance your photos.

Written by
Mike Lehman
Mike Lehman is a senior content strategist at Pikes. Before joining Pikes, Mike spent nearly a decade working with Glossier, Haus, and Athletic Brewing, leading campaigns that blended storytelling and data.